
Today we’re going to talk about Reordering points in QuickBooks point of sale. This will help you in ordering more inventory for your store.
Let’s begin:
Reorder Points from a quick way:
- From your Item List you can easily put Reorder Point by clicking on one the columns then click “Customize Inventory”, then you can now add Reorder point as your column.


- Choose a certain item on the Item list, then double click the Reorder Point. You can now put the number of pieces you want to order on a certain item.

Another step to Reorder Point: - Click on a certain item, then click “Show Details”.

- As you can see the Reorder point is “none”.

- As you can see the Reorder point is “none”.
- Edit items one by one by clicking “Edit”, then you can now put something on your Reordering Point.

- For example, your Reordering Point is “4”.

- The Reorder point is telling point-of-sale that when this item gets below for example “4” then it will automatically reorder.
- For example, your Reordering Point is “4”.
- This is now the outcome.

Now let’s go to Purchasing order from Reorder points. - Go to “Inventory menu” and click “Reminders”.
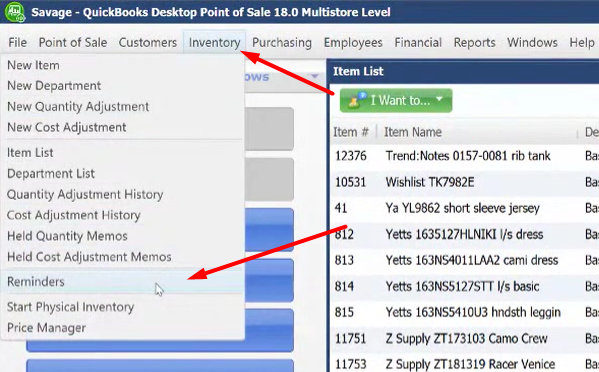
- Reminder screen will appear.

- You will see here the different products that needs to be reordered.
- As you can see on the Reminder screen that the “Available Quantity” of an item is below the number of “Reorder Points”.
- Point-of-sale will help you reorder even if the Available quantity don’t match your Reorder point.
- Go to “I want to”, then click “Suggest PO”.
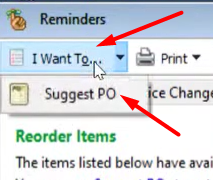
- Suggest PO’s screen will appear. Click “OK”.

- Select “Don’t suggest any quantities”
- In “Reorder items from which vendor?” you can choose a certain vendor or you can choose All Vendor.
- On your Suggest PO’s, Order Quantity column will appear.

- In Order quantity you will put the number of pieces you want to order on a certain item.
- After you fill in the Order Quantity, go to “I want to” and click “Create PO”.

- Purchase Order List will appear.

- Purchase Order List will appear.
- Click the Purchase Order List one by one, then click “Send” on the lower corner of the screen or you can also send it thru “Email”.
